POS - Point of Sale with Stock Management System
Thanks for purchasing
Hi Please read the documentation properly If you have any questions that are beyond the scope of this documentation, please feel free to contact us whatsapp 0112005118
Our support working hours are listed in GMT+6 below:
► Sunday to Saturday : 9:00 AM to 5:00 PM
Process of Installation
Important:If you want to get installation live support(anydesk/teamviwer) from our Expert Team Member, contact us whatsapp number 0112005118. (charges may apply).
Pre-Requirements
- Internet connection(Mandatory) for download and activation.However,the POS doesn't need internet connection to work after activation
- Download setup files
- Unzip PharmTech.zip/Salepoint.zip folder
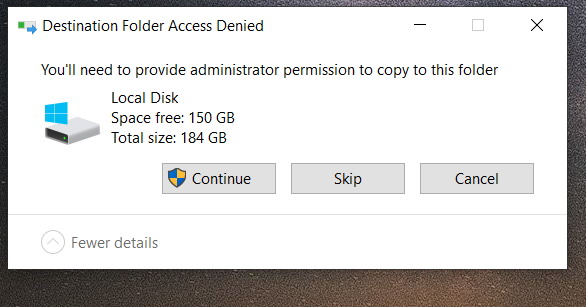
- Inside Pharmtech/Salepoint folder copy PharmTech.exe, copy.bat and shortcut.bat to local disk c. If it propmt you to provide administration permision click on continue
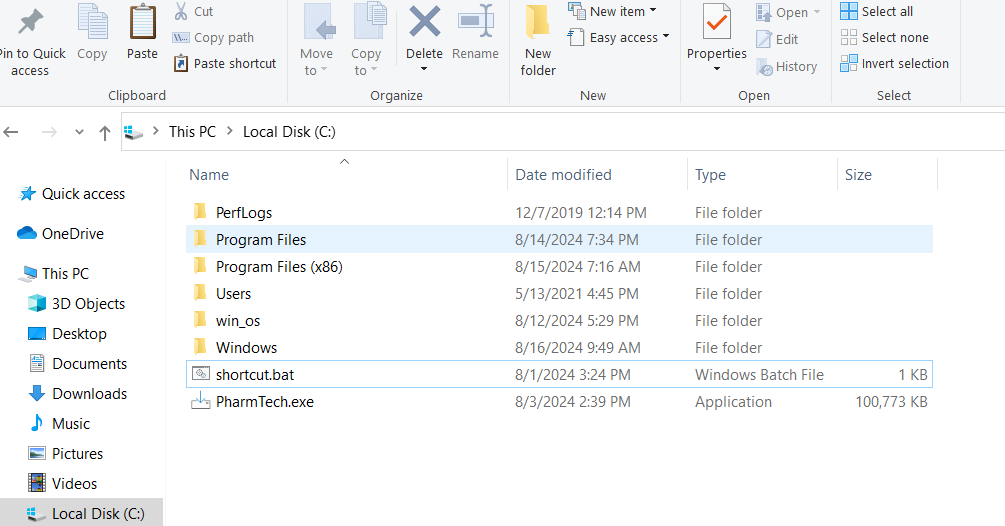
- PharmTech.exe/Salepoint.exe, copy.bat and shorcut.bat are now on local disk c
- Almost done! Now double click on PharmTech.exe to start installation
- After PharmTech.exe/Salepoint.exe finish installation , install shortcut.bat and copy.bat then restart your compuer, a POS icon will be available on desktop to launch POS
- After restart (wait for 1-2 minutes for system to run start server) then Lauch your POS and activate using keys provided when you purchased the POS.Good To Go!
Please follow the instrucions carefully. Thank You
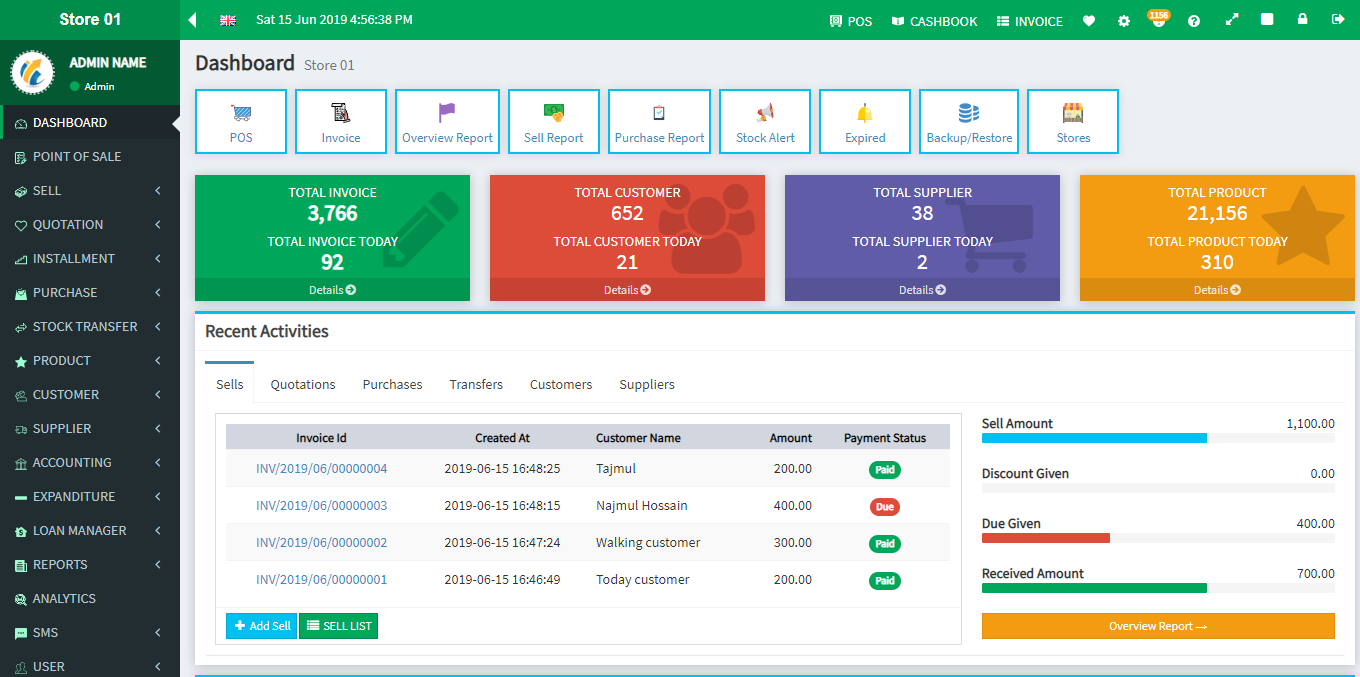
This is the informative Dashboard, From here you will be able to do many work very easily
Dashboard
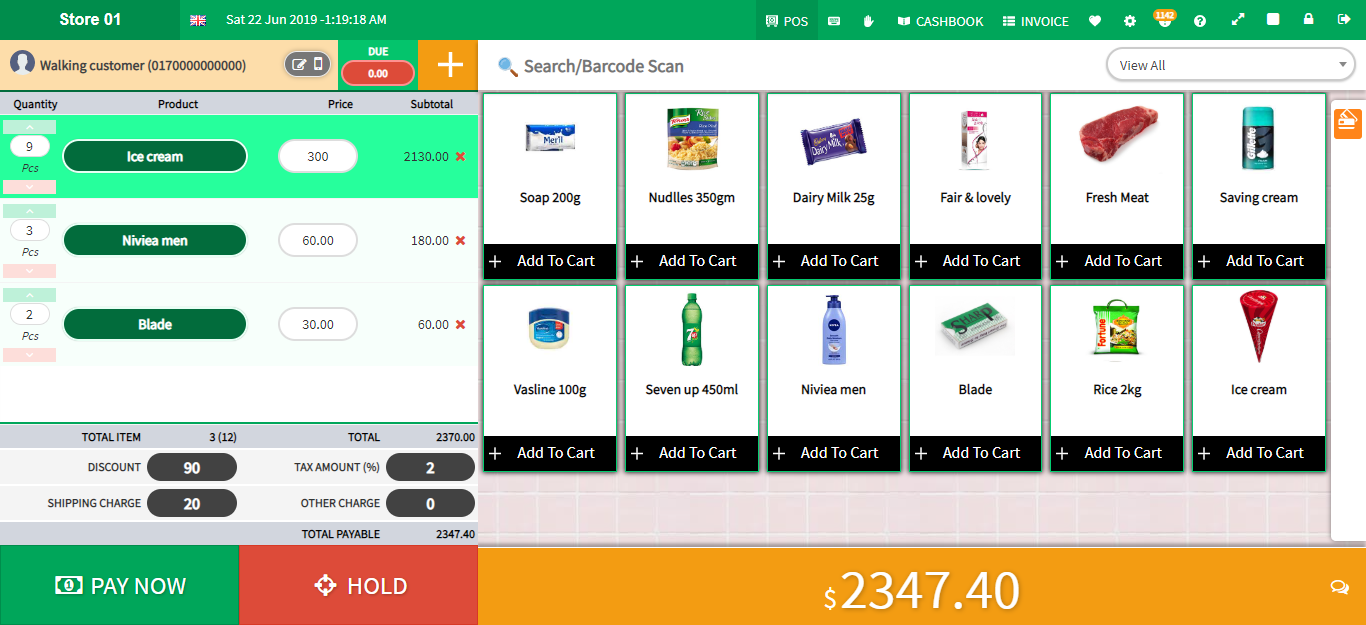
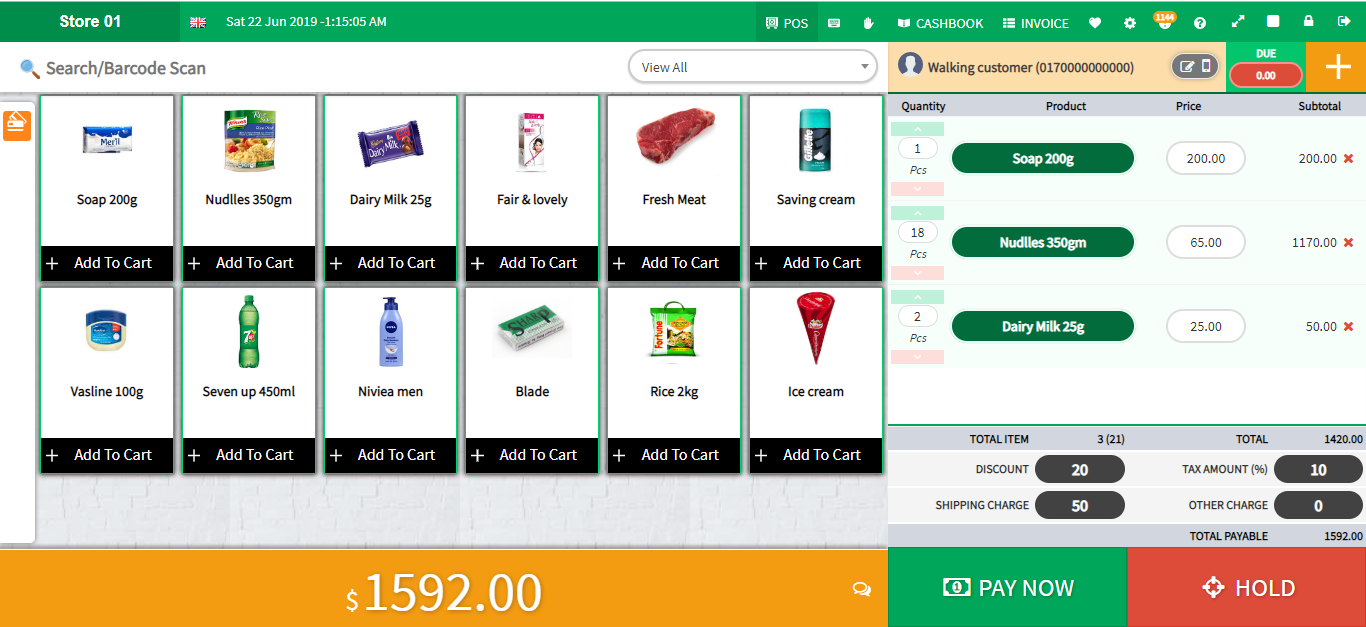
Point of sale
How to make sales
- Dashboard > go to Point of sale from vertical menu or top bar menu.
- After visit point of sale windows select customer first by default walk in customer is auto selected. Incase you like to add new customer click on plus sign next to due
- Then click on the product from the product list window(click many times or you can type in quantity, if you want to add more product)
- You can adjust discount (+add or -minus) manually.
- After selecting product and discount click Pay now button
- Then you will be able to see invoice preview. Then fill the received amount and Press Enter.
- Or Click on a payment method that you will use to get the bill the customer.
- Product successfully sold
- An Invoice will be generated, and you will be able to print easily(Thermal printer has to be connect for printing otherwise close the prompt).
- Left Panel
- Right Panel
Sales
Sale List (Invoice List)
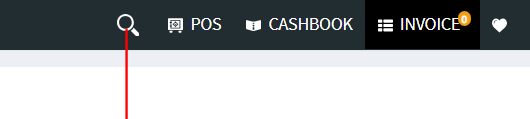
In this section, you will be able to see all invoice in your current store. Moreover, if you want to see invoices for a different date you can filter the invoice list. For filtering date click on the search icon in the top menu bar
- Here you will be able to see the invoice list in your current store.
- You will be able to see invoice details from here
- You can return product from invoice
- You can delete invoice from here
- You can print invoice via POS printer.
Return List(Incase customer return a product you have return it in the system for stock to update)
- Here you will get returned invoice list.
- Returned product name and quantity.
Sales Log
- Here you will get all sales log which entail who sold and method of payment used.
- Returned product name and quantity.
Gift Card
You can issue Gift Card to your customer, customer can use that Gift Card for payment. You can also topup customer gift Card.
Advantage of Gift Card
- Customer can use this gift Card like a cash card.
- Customer can top up his card from your shop
- Seller can maintain easily.
Add New Gift Card
- Dashboard > Gift Card > Gift Card List > Click on Add New Gift Card
- Card Number will generate automatically also you can change the card number by click edit icon.
- Give the value of card(This indicate how much you charge to customer for this card)
- Provide how much amount you want to topup of this card.
Gift Card List
- Dashboard > Gift Card > Gift Card List > Here the all Gift Card list that you issued
- For view or print Gift Card click on view button from the list
- For topup money to Gift Card click on topup button and give the amount and expiry date
- You may also edit and delete any Gift Card from list.
Quotation
In this section, you will be able to create a quotation invoice to give a proposal to any customer or any institution
Add Quotation
- Go to Dashboard > Quotation > Add Quotation
- Fill the form with all required field
- Select the customer and select the supplier list to get that supplier product easily.
- Type your product name in Add product section. You can add multiple product
- Click on submit. A quotation invoice will be created.
Quotation List
- By clicking on action button you can edit the quotation invoice.
- From quotation invoice list you can view the quotation invoice and you can print that invoice.
- In the next time you will be able to convert this quotation to sales invoice via an action button.
Installment(EMI)
From here you can manage your installment invoice. You can sell a product on installment payment from POS screen by click sell with installment button.
Create a Invoice as Installment payment
- Go to Dashboard > Point Of Sale > Select the product > Click on Pay Now button.
- You will get a sell with installment button below the FULL PAID or FULL DUE button.
- After click you will a form about the installment period.
- Duration : This indicate how many days you will give to your customer to pay this amount
- Interval: What the interval between first payment to second or third.
- Total Installment: It will be calculated automatically.
- Interest Amount: If you have any interest amount give the percentage value.You may use zero(0).
Receive Installment Due
- You can receive installment due from installment list
- Go to Dashboard > Installment > Installment List > Here you will get all list of installment sales.
- Click on view button from the invoice.
- Click on Payment button and indicate the received amount.
Installment List
- You will get all installment invoices in this section.
- Go to Dashboard> Installment > Installment List > .
- To preview an invoice click on view button. Here you will get that installment details
- You will get also get due amount and remaining installment and their payment date.
Installment Payment
- You will get all installment paid in this section.
- Go to Dashboard> Installment > Payment List >
Other Payment Function
- Payment Due Today : Here you will get list that you received from installment due.
- Payment Due All : Here you will get all installment due invoice.
- Payment Due Expired : Here you will get all installment due invoice that missed their payment date.
Overview Report
- You will get overview calculation of installment i.e. Total invoice , interest amount, amount received & due amount
Purchase/Add stock
In this section you will be to be able to see a lot of information about product purchase(that you were bought from supplier). You will be able to purchase a product from one supplier at a time.
Purchase List
- Dashboard > Purchase > Purchase List > Here you will get list of all your purchases from supplier.
- To return product to supplier click on return button from that invoice
- You will be able to pay due to your supplier from pay button.
- You pay multiple due by selecting all invoice and click PayAll button next to filter button
- You can filter invoice list by date, click on search icon from Topbar.
Due Invoices
- Dashboard > Purchase > Due Invoices > Here you will get all list of your purchase from supplier that have due.
- You can also pay from this list by clicking pay button.
Add Purchases
- Dashboard > Purchase > Add Purchases > Here you will be able to buy product from any supplier/add stock
- Select supplier first and provide the invoice Id/No.
- Search the product and select from the list and enter the quantity of product
- Then provide product buying price, wholesale price(minimum price a product can be sold, price which cashier cann't go below when giving out a discount) and selling price
- Enter the paid amount (You may take due from supplier)
- Click on Buy Now button
Purchase Log
- Dashboard > Purchase > Purchase Log > Here you will get log of your purchase ie.who made the purchase method of payment, due amount and to which supplier.
- You can also make payment from this list by click pay button.
Stock Import(Incase you have your stock list in excel
- Dashboard > Purchase > Stock Import > Select supplier from dropdown.
- After selecting the supplier a file will be downloaded to your computer and you will be able to edit by simple editor (notepad,sublimeText or excel)
- You will get a sample (Name,Code,QTY). fill the information as per example.
- After that you will be import that file.
- Click on import.
- You will be redirect to the location you have saved your file.
Stock Transfer(Transferring stock from one shop to another
In this section, you will be able to transfer product form one store to another store.
Add Transfer
- Go to Dashboard > Stock Transfer > Add Transfer
- Fill the form with all required field
- Select the sender store and receiver store
- In stock list section you will get all product list from sender store.
- Click on product to trasfer from the list
- Add products in the transfer list section.
- Click on Transfer Now button
- A success message will appear if operarion is completed.
Transfer List
- Go to Dashboard > Stock Transfer > Transfer List
- Here you will be able to see all transfers from your store
- Here you can change the transfer status of any transfer from your store
- When transfer status will be completed, the transfered products amount will be added on receiver store.
Product
Enables you to create products as well as edit or delete Product.
Create New Product
To create a product you have to create a box(product location) and supplier(who will supply product to you) first.How to create a box?How to create a supplier?
- Dashboard > Product > fill up the form under "Add New Product" with valid information
- If you have more store(multi-store) you can add this product to all stores
- After successfully creating a new produts it will be listed on product list with zero stock.
Buy Product From Supplier
- Dashboard > Product > All product will be shown under "View All Product Name"
- Click on the Buy button(symbol of plus) of product item > a floating modal window will appear > fill-up this form by providing valid information
- In search product area you will get product list under that supplier only in this modal window pop up.
- Give the quantity, buy price and sale price in that product
- After providing information click on Buy.
- You will get report how much amount you bought from a supplier in buy report area.
Return Product To The Supplier
- Dashboard > Product > All product will be shown under "View All Product Name"
- Click on the Return(symbol with minus) button of product item > a floating modal window will appear > provide invoice ID and Quantity(that amount you want to return)
- After providing information click on Return
Update and Delete a Product
- Dashboard > Product > All product will be shown under "View All Product Name"
- Click on the edit button of a product item > a floating modal window will pop up > change information> update
- Click on the delete button of a product item > a floating modal window will pop up > select the method >delete
Generate Barcode
- Dashboard > Product > All product will be shown under "View All Product"
- Click on barcode icon button under barcode label of a product item > a floating alert window will pop up> select the quantity and choose barcode type (barcode type CODE 128, CODE-39 & CODE-93 tested by barcode scanner)
- Click on Print
- You can use the barcode scanner to select Product in POS screen
Product Import
- If you need to add a lot of products to your shop you may use this method.
- You need to download .xls file and need to fill-up.
- In that .xls file, you will get a demo product(that is used for instruction only) How to?
- After fill-up that .xls file you need to upload here
- After upload > Click Import
Stock Alert
- Dashboard > Product > Stock alert
- Which product stock amount is low, you will see that product list here.
- You will be able to increase the product quantity by click product buy(symbol of plus) from the stock alert list.
Expired Product
- Dashboard > Product > Expired
- In this section, you can see expired product list
Customer
Here you can manage your customer very easily. You will be able to see customer history with all invoice.
Create New Customer
- Dashboard > Customer > fill up the form under "Add New Customer" with valid information > save
- After successfully creating a new customer will be shown under the "Customer List" section.
View Customer History
- Dashboard > Customer > Click eye icon under view button.
- You will be able to see all previous invoice with all information.
- Otherwise, you will get Due information, lifetime invoice number and lifetime buy amount
Edit and Delete Customer
- Dashboard > Customer > All customer will be shown under "View All Customer Name"
- Click on the edit button of a customer item > a floating modal window will pop up > change information > Update.
- Click on the Delete button of a customer item > a floating modal window will pop up > Choose a method > Delete
Supplier
You can create Supplier, edit or delete supplier.
Create New Supplier
- Dashboard > Supplier > fill up the form under "Add New Supplier" with valid information > save
- After successfully creating a new supplier will be shown under the "Supplier list" section
- From supplier list you will be able to buy product by click buy button.
History of Supplier
- Dashboard > Supplier > All supplier will be shown under " Supplier List"
- Click on the view button of a supplier.
- You can see all invoice and more info that you bought from that buyer
- You will get a lifetime history of the supplier.
Edit and Delete a Supplier
- Dashboard > Supplier > All supplier will be shown under the "Supplier List"
- Click on the edit button of a supplier item > a floating modal window will pop up > change information and Click on the Update button
- Click on the Delete button of a supplier item > a floating modal window will pop up > select a method > delete
Accounting
Here you will be able to maintain your Banking accouting system. You can manintain multiple bank account from here
Deposit
- Dashboard > Accounting > Deposit
- Fill-up the informaion
- Click on Deposit
Withdraw
- Dashboard > Accounting > Withdraw
- Fill-up the informaion
- Click on Widthdraw
Transfer Fund
You can transfer to your another bank account.
- Dashboard > Accounting > Transfer Funds
- Select the sender account and receiver account and Fill the all information
- Click on Transfer Now
Transfer List
You can see transfer list to your another bank account.
- Dashboard > Accounting > Transfer List
- Here you will get all transfer list with details information
Transaction List
- Dashboard > Accounting > Transaction List
- Here You will get all bank account transaction in this transaction list.
Bank Account List
- Dashboard > Accounting > Bank Account List
- Here You will get all list of your bank account
- For add new bank account click on Add New Bank Account and Fill-up the all information
Income Source
- Dashboard > Accounting > Income source
- Here You can add income source
- For add New Income Source click on "Add New Income source" and Fill-up the all information
Income Monthwise
- Dashboard > Accounting > Income Monthwise
- Here You can see how much amount you were earned from different income sources
Income & Expense
- Dashboard > Accounting > Income & Expense
- Here You will get a report about Income and Expense
Profit & Loss
- Dashboard > Accounting > Profit & Loss
- Here You will get a report about Profit & Loss, You will be able to filter this report
Cashbook
- Dashboard > Accounting > Cashbook
- You need to entry opening balance of your present day.
Transaction List
- Dashboard > Accounting > Transaction List
- Here you will get details of all transaction like . sell transaction , buy transaction , bank deposit transaction and bank withdraw transaction.
Balance Sheet
- Dashboard > Accounting > Balance Sheet
- Here you will get overall report of your bank accounts
Expense
Here you will get information about expense of your shop like Shop rent, Electricity bill, and Tea bill etc.
Add a Expense
- Dashboard > Expense > Add Expense
- Fill out the form by providing valid information.
- Save
Expense List
- Dashboard > Expense > Expense list
- Here you will get all expense list based on your filtering.
- Expense report will be displayed in the final report.
Category
- Dashboard > Expense > Category
- Here you can create expense category.
- Expense category will be displayed in the Add New Expense section.
Summary
- Dashboard > Expense > Summary
- Here you will get expense summany.
- Expense will show as category with day, week ,month and year wise
Loan
Here you can manage loan that you will get from any bank or any other institute to extend your business.
Take a Loan
- Dashboard > Loan Manager > Take Loan
- Fill out the form by providing valid information.
- Click on SAVE for take loan
Loan List
- Dashboard > Loan Manager > Loan list
- Here you will get all expense list based on your filtering.
- From list, you will be able paid loan amount
- By click view button you will get loan paid history
Loan Summary
- Dashboard > Loan Manager > Loan summary
- Here you will get summary report about your loan
Report
You will get a lot of reports from here like Overview Report, Sell report, Buy report, Payment report, Stock report(this will help you to get a day month or year overview)
Overview Report
- Dashboard > Reports > Overview report
- You will get an Overview report information with Profit, sell amount, Tax collection amount, discount amount etc. for a day, month or year(Depends on your filtering)
Collection Report
- Dashboard > Reports > Collection report
- Here you will get Staff wise collection amount from customer
- You may filter by date. (filter icon present in the top menu bar with search icon)
Due Collection Report
- Dashboard > Reports >Due Collection report
- Here you will get due collection report
- You may filter by date. (filter icon present in the top menu bar with search icon)
Supplier Due Paid Report
- Dashboard > Reports >Supplier Due paid
- Here you will get supplier due payment report(that you paid)
- You may filter by date. (filter icon present in the top menu bar with search icon)
Sell Report
- Dashboard > Reports > Sell Report
- You will get a product list with the number of sales in a day, month or year(Depends on your filtering)
Purchase Report
- Dashboard > Reports > Purchase Report
- You will get daily, monthly, yearly(Depends on your filtering) Purchase report(product bought, amount spent, due etc. from the supplier)
Sell Payment Report
- Dashboard > Reports > Sales Payment Report
- Here you will get sales payment report(that you received from customer)
- You may filter by date. (filter icon present in the top menu bar with search icon)
Purchase Payment Report
- Dashboard > Reports > Purchase Payment Report
- Here you will get purchase payment report (that you have paid supplier)
- You may filter by date. (filter icon present in the top menu bar with search icon)
Sell Tax Report
- Dashboard > Reports > Sell Tax Report
- Here you will get sales tax report (that you are collect form customer)
- You may filter by date. (filter icon present in the top menu bar with search icon)
Purchase Tax Report
- Dashboard > Reports > Purchase Tax Report
- Here you will get purchase tax report (You were paid to your supplier)
- You may filter by date. (filter icon present in the top menu bar with search icon)
Tax Overview Report
- Dashboard > Reports > Tax Overview Report
- Here you will get general view of different operations
- You may filter by date. (filter icon present in the top menu bar with search icon)
Stock Report
- Dashboard > Reports > Stock Report
- You will get the Stock report)
- You will get product quantity
- You can calculate the total number of product in your shop
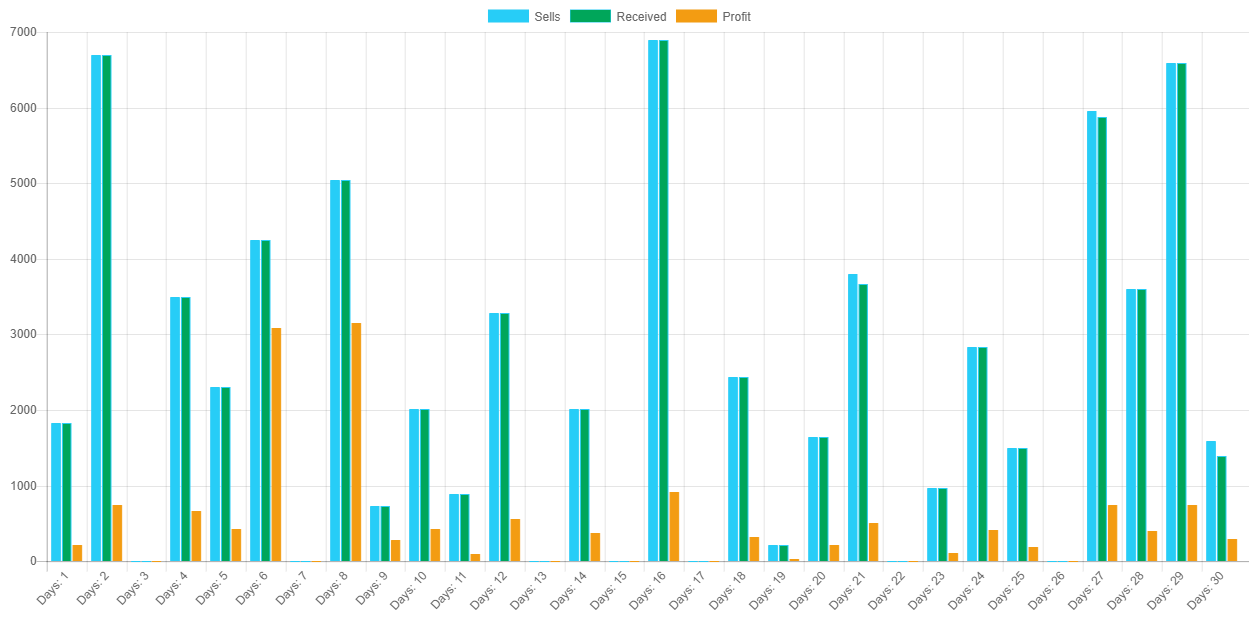
Analytics
You can see an overview analysis of your shop
- Dashboard > Analysis
- Here you will get Today's profit, weekly, Monthly, and yearly top product,best customer etc..
- You will get a graph about your income & expense in current month
User
You can create user accounts. Here you will get different user group with different privileges.
Create New User
- Dashboard > USER > user > fill up the form under "User list" with valid information > save
- A user will log in by using their e-mail address.
- After successfully creating new user will be shown under "User list" section
Edit and Delete User
- Dashboard > USER > User > All user will be shown under "User list"
- Click on the edit button of a user > A floating modal window will pop up > change information > Update.
- Click on the delete button of a user > a floating modal window will pop up > Choose a method > Delete
Password Change of User
- Dashboard > USER > Password > click here for change password
- Select the user and give the new password
- Update
Create New Usergroup
- Dashboard > USER > Usergroup > fill up the form under "Add New usergroup" with valid information > save
- After successfully creating new usergroup will be shown under "Usergroup list" section
Edit and Delete Usergroup
- Dashboard > USER > Usergroup > all user will be shown under "Usergroup list"
- Click on the edit button of a usergroup > a floating modal window will pop up > change information > Update
- Click on the delete button of a usergroup > a floating modal window will pop up > Choose method > Delete
Give Permission
- Dashboard > USER > Usergroup > All user will be shown under "Usergroup list"
- Click on user group edit permission > a floating modal window will pop up > check the permission from permission list that you want to provide that group of user.
- Click Update button
Filemanager
All file will be present here, you will be able to manage all media files.
Setting
Here you will be able to add payment method currency and user preference.
If you have more shop and if you would like to manage more shops using this software, it's completely possible and very easy. However you system has to be online
Create new store
- Dashboard > Settings > Store > Add Store
- Fill the form by provide valid information
- Save
Select a Store
- Dashboard > Settings > Store > Store List
- Here you will get all store list
- From that list click on active that you want to visit
Brand
- Dashboard > Setting > Brand
- From here you can add brands name when you will crate a product.
- From brand list you can update or delete any brand.
Create New Currency
- Dashboard > Setting > Currency > Add New Currency
- Fill out the form by providing valid information.
- Save
- After successfully creating new currency will be shown under "currency list" section.
Activate Currency
- Dashboard > Settings > Currency > All currency will be shown under "Currency list"
- Click on the activate button and confirm
Edit and Delete Currency
- Dashboard > Settings > Currency > All currency will be shown under "Currency list" section
- Click on the edit button of a currency > a floating modal window will pop up > change information of currency > Update
- Click on the delete button of a currency > a floating modal window will pop up > Choose method > delete
Add New Payment Method
- Dashboard > Settings > Payment method > fill up the form under "Add new payment method" with valid information
- Save
Edit and Delete Payment Method
- Dashboard > Settings > Payment method> all payment method will be shown under "Payment method list" section
- Click on the edit button of a payment method > a floating alert window will pop up > Click on Update
- Click on the Delete button of a payment method > a floating alert window will pop up >choose method > Click on Delete
Unit
Unit means product unit i.e. Kg,piece.
- Dashboard >Setting > Unit
- Give the unit name.
- Save
Tax Rate
This Tax Rate is based on product. so you can select a Tax Rate when you will be crating a product or update a product.
- Dashboard >Setting >Tax Rate
- Fill the required information
- Save
Create Box
The box is important for every product, Box indicates the position of a product. You may call it box or Shelf (Where a product is located in your shop)
- Dashboard >Box > Add New Box
- Give the box name(Location, Shelf shortcode or section name) and details.
- Save
Printer Add
If you want to use POS printer so this is for you. If you are not intested to use POS printer so just avoid this section.
- Dashboard > Settings > Printer > Add New Printer
- Give the all information
- Name: Give the title of your printer(Just name)
- Type: Select the network type
- Character per line: give the number of character that will print in a line on invoice
- IP Address: Provide the IP address of your printer like 192.168.223.201
- IP Address: Port of your printer use. (Most printer uses 9100 port)
- Click on Save
- After adding a printer go to store settings and select POS printer and choose print will be automatically or not.
Backup Data
- Dashboard > Settings > Backup/restore > Backup tab
- Click on Export button
- An SQL file will download in your computer
- Store this SQL file very carefully
- Your shop data successfully backup.
Restore Data
- Dashboard > Settings > Backup/restore > Restore tab
- Click on Import button
- Select your previous backup file(.sql)
- After select restore process will start. It may take several minutes.
- After complete restore process, A confirmation message will appear.
01. How to add a POS printer ?
Follow this steps
- Dashboard > Settings > Printer > Add New Printer
- Give the all information
- Name: Give the title of your printer(Just name)
- Type: Select the network type
- Character per line: give the number of charcater that will print in a line on invoice
- IP Address: Provide the IP address of your printer like 192.168.223.501
- IP Address: Port of your printer use. (Most printer uses 9100 port)
- Click on Save
- After adding a printer go to store settings and select POS printer and choose print will be automatically or not.
Tested Feature
We Tested this feature
POS Printer
- supported this type POS printer
Barcode scanner
- We have tested bacode scanner.
- Supported barcode type: CODE 128, CODE-39 & CODE-93.
How to use Barcode scanner
- First : Plugin barcode scanner to computer
- Second : Go to POS page and scan the barcode from product label
- ** Be ensure need to scan that you were add when you were add this product
Indian GST
- For use Indian GST go to store setting and change the invoice view setting from standard to Indian GST.
- Indian GST support with all feature (IGST,CGST,SGST)